BSc 2nd Year Methods in Microbiology Notes Study Material
BSc 2nd Year Methods in Microbiology Notes Study Material: BSc is a three-year program in most universities. Some of the universities also offer BSc Honours. After getting enrolled for BSc, there are certain things you require the most to get better grades/marks in BSc. Out of those, there are BSc Study Material, BSc Sample Model Practice Mock Question Answer Papers along with BSc Previous Year Papers. At gurujistudy.com you can easily get all these study materials and notes for free. Here in this post, we are happy to provide you with BSc Methods in Microbiology Notes Study Material.

BSc 2nd Year Methods in Microbiology Notes Study Material
A subject can only develop according to the techniques available. It must be evident from the history of microbiology how important is a suitable methodology in the development of a discipline. Three techniques, in particular, are to be mastered before the science of microbiology could evolve beyond a primitive visionary state.
- Microscopy:- Since microbiology is mainly concerned with the study of living organisms of microscopic dimensions, its development depended entirely upon the refinement of the microscope. (BSc 2nd Year Methods in Microbiology Notes Study Material)
- Sterilization methods:- In order to grow a particular microorganism, the medium used had to be freed from all other living organisms i.e. sterilization methods had to be developed. (BSc 2nd Year Methods in Microbiology Notes Study Material)
- Pure culture methods:- Once it was possible to obtain suitable sterile growth media, it became practicable to introduce methods to separate different microbes from each other and to maintain them in pure culture. Then could be studied their individual characteristics. We shall consider each of these critical developments in somewhat detail.(BSc 2nd Year Methods in Microbiology Notes Study Material)
Microscopy
There were no suitable means of magnifying invisible organisms prior to the 17th century. We have already seen how Anton van Leeuwenhoek is honored for providing the first accurate report of the occurrence of bacteria with the help of his single-lens microscopes of the simplest possible design. He could make lenses and use them to build magnifying glasses to provide a magnification of about 200 times.
It is true that Robert Hooke had used a compound microscope in the 18th century, but these were incapable of good performance, due to defects such as chromatic and spherical aberration inherent in their basic design. During the 18th century these defects were gradually overcome by the following refinements :
(1) corrected complex eyepiece and objective lenses,
(2) a condenser to focus light on the object,
(3) a thin glass coverslip to place over a liquid drop on a glass slide so that object within the liquid could be viewed in a flat plane,
(4) the oil-immersion lens to increase resolving power.
Later there took place many refinements in microscopy, particularly during the current century. At present, there are available different kinds of microscopes.
Modern technology has provided microbiologists with a wide range of instruments to observe microorganisms. These instruments range from the most common bright-field microscope to several specialized instruments and the highly sophisticated electron microscope.
All these operate on a common principle: a type of energy is projected toward the object; the energy bounces off the object and creates an impression on a sensing device. This may be a television screen, a photographic plate, or the human eye. The image reveals the shape, size, and arrangement of the microorganism. (BSc 2nd Year Methods in Microbiology Notes Study Material)
Bright-field (Light) microscopy
This is the most familiar microscopy. The light microscope is a two-lens system in which the lens nearest the object is known as the objective lens and that nearest the eye, is known as the ocular lens. Visible light rays are projected through a condenser that focuses them into a sharp cone, then sends them through the opening in the stage on which the slide rests. The light passes through the slide, bounces off the object, then passes through the objective lens to form a magnified image darker than the background around it.
This image is a real image that can be projected onto a screen. The image now becomes an object for the ocular lens and the light rays are magnified a second time creating a virtual image in space visible only to the observer.
The dual-lens system is referred to as a compound microscope to distinguish it from a single-lens system such as that used by van Leeuwenhoek. In addition, a laboratory microscope usually has three objective lenses called the low-power, high-power, and oil-immersion lenses. (BSc 2nd Year Methods in Microbiology Notes Study Material)
Generally, these magnify objects with 10, 40, and 100 diameters, respectively, and the magnification is represented by the multiplication symbol “X”. The total magnification of the microscope is determined by multiplying the objective magnification by the magnification of the ocular lens. Thus, if the latter were 10 X, the total magnifications achieved would be 100 x, 400 x, and 1000 x, respectively.
Dark-field microscopy
In this case, a dark background is established, and only the object is illuminated. A special condenser scatters the light and causes the light to hit the object from different directions. Some light is reflected from the object into the lens, and the object is seen clearly, but since there is no direct background light, the surrounding area appears dark: This microscopy is important in the diagnoses of certain diseases when small live organisms near the limit of resolution of the microscope must be observed.
For example, the syphilis spirochete, and Treponema pallidum may be seen in scrappings taken from a skin lesion. Since the stain is not used, the organisms may be seen moving about with a characteristic rotary motion.
Phase-contrast microscopy
This allows organisms to be seen alive and without staining. One can easily see the internal details which can not be easily visualized with bright-field microscopy. Bacterial granules, and the fine structure of protozoa and fungi may be studied.
The phase-contrast microscope contains a series of special filters and diaphragms that split the light beam and throw the rays slightly out of phase. The separated light then passes around microscopic objects as well as through them, and small differences in the densities of the objects show up as different degrees of brightness and contrast. The Nobel prize in physics was awarded in 1953 to the Dutch physicist, Fritz Zernike for developing this system. (BSc 2nd Year Methods in Microbiology Notes Study Material)
Fluorescent microscopy
The process consists of coating a microbe with a fluorescent dye such as fluorescein and illuminating it with ultraviolet light. As the electrons in the dye are excited, they move to high energy levels, then quickly drop back giving off the excess energy as visible light. The object appears to fluoresce. The most important application of this microscopy is in the fluorescent antibody technique.
Electron microscopy
The main point here is the unusually short wavelength of the electron beams, substituted for light energy. The wavelengths of about 0.005 nm increase the resolving power of the instrument to fractions of a nanometer. It makes it possible to see viruses and larger molecules clearly.
Two types of electron microscopes are in use today:
1. Transmission electron microscopy (TEM):- This is used to see the fine structure of cells. Ultra-thin sections of the object are prepared, by embedding or freezing the specimen and sectioning it with a diamond or glass knife. Sections are floated in the water and picked up on a wire grid. They are stained with a heavy metal (gold or palladium) to make certain parts dense and inserted in the vacuum chamber of the microscope. A 100,000-volt electron beam is focused on the section and manipulated by magnetic lenses.
A photograph prepared from the image may be enlarged with enough resolution to achieve a total magnification of over 20 million times. Objects as small as 1.0 nm may be observed. (BSc 2nd Year Methods in Microbiology Notes Study Material)
2. Scanning electron microscopy (SEM):- This microscopy allows surfaces of objects to be seen in their natural state without staining. The specimen is put into the vacuum chamber and covered with a thin coating of gold to increase electrical conductivity and thus forms a less blurred image. The electron beam then sweeps across the object building an image line by line as in a TV Camera.
As electrons strike the object, they knock loose showers of electrons that are captured by a detector to form the image. Magnifications with this microscopy are limited to about 75,000 -100,000 diameters.
The degree of magnification needed to observe a microbe depends upon its size. Bacteria, fungi, algae, and protozoa can be viewed with a light microscope. Smaller microorganisms, like viruses, as well as the internal structures of cells, require the use of an electron microscope.
The choice of a particular microscope depends upon the size of the object, the degree of detail that must be viewed, the nature of the specimen, and the overall purpose of the microscopic observations. The table shows the features of different types of microscopes including their strength, limitation, and applications. (BSc 2nd Year Methods in Microbiology Notes Study Material)

Methods of Sterilisation
Sterilization is the complete destruction or removal of all living organisms from the object being sterilized. The development of methods of sterilization was mainly a consequence of the controversy over spontaneous generation culminating in the work of Pasteur.
Experiments designed to prove or disprove spontaneous generation depended upon two general principles:
(1) the complete sterilization of a suitable growth medium so that no living organisms exist at the start of the experiment, and the design of the vessel of a type that it is impossible for microbes to enter from outside. This was necessary following the realization of the existence of microbes floating around in the air. (BSc 2nd Year Methods in Microbiology Notes Study Material)
If these two principles are strictly followed and conditions are otherwise suitable for the multiplication of microbes, any growth occurring must be the result of spontaneous generation. Thus, the key question was how good methods were for (i) attaining, and (ii) maintaining sterility. Let us consider these two principles.
[I] The attainment of sterility
The usual method depended upon heat treatment. However, it was soon realized that microorganisms vary widely in their resistance to heating. Bacteria Methods in Microbiology require higher temperatures and some also produce heat-stable spores.
Thus boiling at normal pressure was insufficient to kill these spores and, therefore, the autoclave was designed to increase the pressure, and, thereby, the temperature. sterilization. Sealing of the flask was not proper as oxygen, known to be essential for many forms of life, could no longer enter the vessel. It was necessary, therefore, to include some kind of filter to prevent the entry of microbes but not air. This led to the development of the cotton wool plug which was soon adopted universally by microbiologists.
By the end of the 19th century, most of the methods currently used for sterilization had been developed. These are briefly summarised below:
- Heat:- For general sterilization, a time and temperature that kill all organisms including heat-resistant spores are used. The methods generally adopted are as follows:
(a) Wet heat in an autoclave. The usual method is a time of 30 minutes at a pressure of 1.05 kg/cm’ which will give a temperature of 121°C. This is the best method, if practicable. (BSc 2nd Year Methods in Microbiology Notes Study Material)
(b) Tyndallization. This is a course of three periods of boiling at 100°C for 30 min. at daily intervals.
(c) Dry heat. This is done in a dry oven, where a temperature of 160° C for two hours is usually required.
- Filtration:- The liquid or gas to be sterilized is passed through a filter with a porosity sufficient to remove any microorganism in suspension. Cotton wool is used for gases. For liquids, a variety of filters are available, made of materials such as cellulose nitrate (millipore filters). This method is very useful for the sterilization of liquids containing heat-labile components.
- Radiation:- Ultraviolet light is very effective in the sterilization of air. For solids, we generally use gamma rays or X-rays from a source such as radioactive cobalt. Ionizing radiation is often used to sterilize plastics and other heat-labile materials.
- Chemicals:- Many chemicals are lethal to microbes. Hypochlorite solution and phenolic derivatives are used as general laboratory disinfectants. A similar chemical is gaseous ethylene oxide. However, these may not cause sterilization under some conditions.
Culture Media
A culture is any growth or cultivation of microorganisms. Cultivation is the process of inducing microbes to grow. The term culture is usually employed for deliberate growth in the laboratory. Microbes are thus cultivated in vitro (Latin vitro=glass i.e. in flasks, tubes, vessels, etc). A pure culture is one that contains only a single kind (species) of microbe. To culture microbes in the laboratory, we require the preparation of substances that they can use as food. Such nutrient preparations that microorganisms can use as food are called culture media.
Different microorganisms require different nutrient materials. Thus culture media vary in form and composition, depending on the species to be cultivated. (BSc 2nd Year Methods in Microbiology Notes Study Material)
There are three main types of culture media: (i) Natural or empirical culture media. (ii) Synthetic or defined culture media, and (iii) Living media.
[1] Natural (empirical) culture media
These were widely used in the early days of microbiology. These include min urine, diluted blood, vegetable juices, meat extracts, infusions, etc. Most empirical media contain either only or a major ingredient, peptone (a trypsinized or hydrolyzed protein).
Peptone sources are animals (meat or casein) or vegetables (soybeans, cotton seeds). In composition, peptones are mixtures containing in only partly known concentrations and identity, a variety of peptides and polypeptides, proteoses, amino acids, carbohydrates, etc. including inorganic and many organic micronutrients. Peptones provide in soluble and assimilable form all the P, S, and essential mineral content of living material as well as the organic C and N sources. (BSc 2nd Year Methods in Microbiology Notes Study Material)
Among meat extracts and infusions, beef tea (beef extract) and an aqueous meat infusion made by infusing (soaking) fresh, ground meat in water are common ingredients of media useful for many species. Beef infusions are rich in minerals. organic micronutrients, proteins, protein derivatives, and carbohydrates. They are often supplemented with 1% peptone or yeast extract. Culture fluids made from beef infusions are commonly called infusion broth, whereas those made from beef extract as extract broth.
All such empirical media including simple solutions of peptones or yeast extracts are sometimes loosely included in the general terms ‘[=nutrient broth or nutrient solution. Fresh extracts of vegetables such as tomatoes, oranges, etc. are used for many bacteria, yeasts, and molds. To any of the empirical media, one may add many different substances for different purposes (as a choice for a specific bacterium).
These then become special media. For example, blood, which contains a great variety of carbohydrates, esters, alcohols, glucosides, etc. is added to an infusion broth, which then is named blood-infusion broth. Lactose may be added to the broth and is known as lactose broth.
[II] Synthetic or defined culture media
They consist wholly of dilute, reproducible solutions of chemically pure, known inorganic, and/or organic compounds. Artificial media of exactly known, reproducible composition are called synthetic or chemically defined media. The formulation and use of these media require exact knowledge of the nutritional requirements of the microorganism to be cultivated. The simplest inorganic synthetic culture medium for common, sulphur-oxidising, chemolithotroph, soil bacterium, Thiobacillus thiooxidans is as follows:
(NH4)2, SO4 – 0.2 g; MgSO4.7H20-0.5 g; KH2 PO4 – 3.0 g; CaCl2-0.25 g; S(powdered)—10.00 g; Dist. H2O to make 1 liter.
In modern laboratories, dehydrated media are used. Commercially available portable, dehydrated, powdered, bottled mixtures of a great variety of dehydrated media or their ingredients are used. These are prepared simply by adding weighed portions of the ingredients to the required amount of water. (BSc 2nd Year Methods in Microbiology Notes Study Material)
Synthetic media may be a general-purpose medium used for the majority of microbes or selective media used for a selected microbe or differential media used for differential isolation of microbes in the same sample. We describe these media later under pure culture methods.
[III] Living culture media
These are groups of living cells such as tissues, calluses, or an organ used for growing viruses, rickettsias, etc. Chick embryos are commonly used for the cultivation of viruses. Yeasts, molds, and bacteria, if enter as contaminants, they are able to multiply in the fluids of the chick embryos as in a culture tube. (BSc 2nd Year Methods in Microbiology Notes Study Material)
Pure Culture Methods
In order to obtain a pure culture of any microorganism, any method to be used must ensure the introduction of a single cell into a sterile growth medium in a suitable culture vessel. The small size of most microbes makes the mechanical separation of single cells impossible. Though recent development of the micromanipulator has made this possible, it is a difficult and specialized instrument for routine work.
Consequently, other methods had to be discovered which had the effect of diluting a sample so that single cells were obtained that could grow to produce a pure culture. Earlier methods depended upon a dilution of the culture until an aliquot was likely to contain theoretically a single cell as judged from an initial count. However, such methods are tedious, unreliable, and can only be used for the dominant organisms. These methods are now rarely used. Microbiologists began to find the possibility of diluting on a solid surface.

The sample is placed at one point on a sterile solid growth medium and then, using a sterile needle, the sample (or inoculum) is drawn several times over the surface (as in the streak-plate method). Each streak represents a dilution process and eventually, single cells are obtained along the streak. Each of these, on incubation, grows up into a separate colony, which can be used for pure culture.
This, streak method was pioneered by Robert Koch. An alternative to the streak method is the pour plate method. Here the diluted sample is mixed with a previously melted agar growth just above the solidifying point. The mixture is poured is incubated. Each cell produces a colony with procedures of diluting the sample shown in Figure.
We shall describe different methods of pure culture in somewhat detail now. The following three are the most commonly used methods of pure cultures in laboratory work: (i) pour plate method, (ii) streak plate method, and (iii) spread plate method.
Before we describe the detailed procedure of each method, we would present the method for obtaining serial dilutions of the sample, from which a pure culture is to be made. (BSc 2nd Year Methods in Microbiology Notes Study Material)
Serial dilutions of the sample
The procedure is shown diagrammatically in Figure. If we take one ml of the original sample (say a known weight of soil mixed in a known volume of sterile water to have a soil suspension that contains a microbial mixture) and add it to 9 ml of sterile water, it will give 1:10 or 10 dilutions of the original sample, i.e. the original sample has been diluted to 1/10th.
Similarly we may prepare 1:100 (10-2), 1:1,000 (10-3), 1:10,000 (10-4), and so on dilutions of the original sample as shown in Figure 2. Finally, one ml aliquot of any dilution is added to a sterile Petri dish to which is added 9 ml of sterile, cool, molten agar medium.
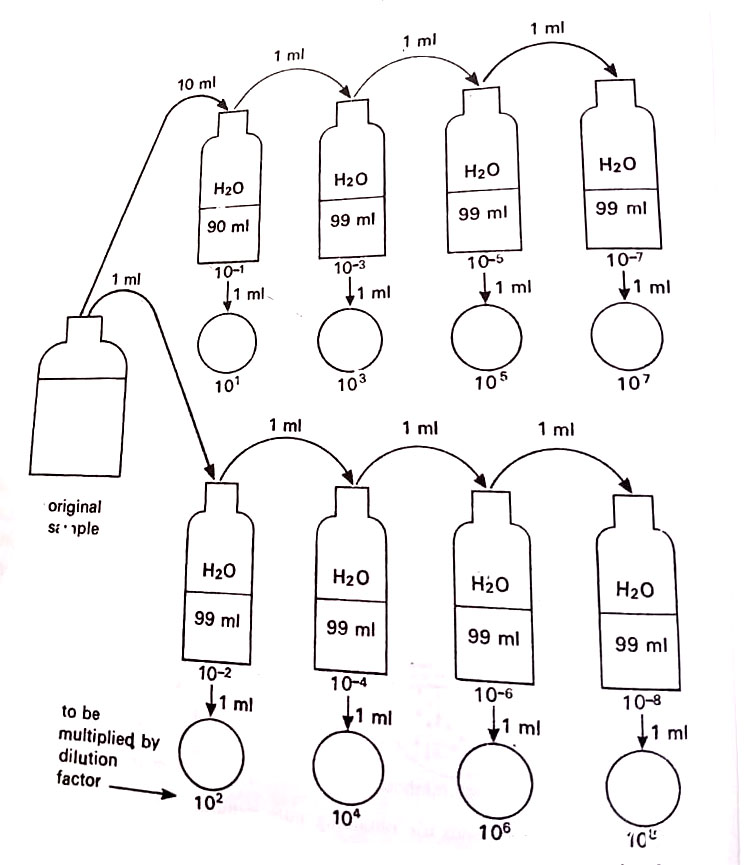
The dishes are incubated at a suitable temperature. Within a few days, colonies of each kind of microbe grow in the dish.
The number of colonies of each kind is counted. This number is then multiplied by the dilution factor to find the total number of cells per ml of the original sample. This method is, therefore, also used for quantitative estimation of microbial cells in a known volume of the original sample. Suppose, we use one ml of 10dilution and 15 is the total number of cells per ml of this dilution. The total number of cells per ml of the original sample will be 15 x 1,000 (dilution factor) i.e. 15,000 cells. (BSc 2nd Year Methods in Microbiology Notes Study Material)
Serial dilution can also be used for pure culture and is thus called the serial dilution method. A pure culture may be obtained by serially diluting the sample with sterile water to the point of extinction in a number of cells. This method is used only if the organism to be isolated is present in large numbers in the mixture. (BSc 2nd Year Methods in Microbiology Notes Study Material)
Suppose we have a bottle of any sample containing 10 ml of the soil sample in sterile water, and it contains 1000 microorganisms, which means 100 microbes per ml. If we take out one ml of it and mix it with 9 ml of sterile water, we then have 100 microbial cells in 10 ml, or 10 microbes per ml (i.e. 1:10 or 107 of the original sample).
If we add one ml of this to another 9 ml of sterile water, then each ml would contain a single microorganism. This is just what we want. If we use one ml of this final dilution to inoculate some sterile medium, and we obtain growth, this presumably came from one cell and is pure.
[1] Pour plate method
As explained above, the sample is diluted successively with sterile water. The agar medium is maintained in a molten state at 45° C. One ml of each dilution is added to each sterile Petri dish which is then poured with 9 ml of sterile, cool agar medium. The contents are thoroughly mixed and allowed to solidify. They are incubated at a suitable temperature. After a few days, different kinds of micro grow as separate colonies. Cells from individual colonies may be picked subcultures.

[II] Streak plate method
A small amount of sample is transferred onto the surface of a suitable, solid agar medium either by a loop or transfer needle. This is then streaked in such a way as to provide successive dilutions and ultimately to have well-isolated colonies Streaking may be done in any of the ways shown in Figure. In each case, the sample becomes progressively diluted and at the end of the streak, one would expect well-isolated colonies. (BSc 2nd Year Methods in Microbiology Notes Study Material)
[III] Spread plate method
An aliquot of the diluted sample is placed onto the agar surface and is spread uniformly with a sterile, bent glass rod. Both streaking and spreading methods are useful particularly in separating aggregates of cells in the sample. There may be needed repeated streaking and spreading in the case of pure culture of diplococci, sarcinae, streptococci, and staphylococci.
[IV] Special methods
The above said three methods are the most commonly used methods for the majority of microbes. There are also some special methods that are used only for the restricted type of microbes. These methods are as follows:
- Enrichment cultures. This method is used for those microbes which are in small numbers in the sample and whose growth is slower than other species present. Some bacteria have very specific requirements for their growth. The principle of enrichment culture is to control the nutrients and culture conditions (temp., air supply, light, pH, etc.) in such a way that it suits only the given species.
If a medium containing salt solution with NaNO2 at pH 8.5 is inoculated with a sample of garden soil and incubated in the air in the dark at 25-30°C, pure colonies of Nitrobacter can be obtained. Cultures of other soil bacteria may be selectively enriched by varying the composition of the medium and the conditions of incubation as shown in the Tables. - Single-cell isolation. Single cells can be isolated by a micromanipulator by which very fine glass pipettes can be manipulated mechanically in the field of the microscope. Droplets containing individual bacterial cells are deposited on a coverglass in a special chamber. The droplets are then transferred by sterile micropipettes to suitable nutrient media.
- Selective media. Such media contain specific chemicals which do not affect the growth of the bacterium to be isolated but discourage the growth of other bacteria in the mixture. For example, the addition of sodium azide at a specific concentration into media selectively isolates lactic acid bacterium. There are many other selective agents used as dyes (for brucellas). cetrimide (for Pseudomonas aeruginosa), tetrazolium (for halophytic bacteria), bile salts, antibiotics, etc.
- Differential media. They contain dyes, reagents, or chemicals that allow the observer to distinguish between types of bacterial colonies de after incubation. For example, if raw sewage is streaked or spread methylene blue (EMB) agar some bacteria produce brilliant green color gummy, pink colonies with dark centers. (BSc 2nd Year Methods in Microbiology Notes Study Material)
Staining of Bacteria
The following methods are commonly used.
[1] Simple stain technique
A small amount of bacteria is placed in a droplet of water on a glass slide; then it is air-dried. The slide is passed through a flame in a process called heat-fixing which fixes the cells to the slides, kills most organisms, and prepares them for staining.
Now the slide is flooded with a basic dye such as crystal violet or methylene blue for a minute or so. The positive-charged dye is attracted to the bacterial cytoplasm which has a negative charge, and staining takes place. This is effective for vegetative cells, the stains do not easily penetrate spores.
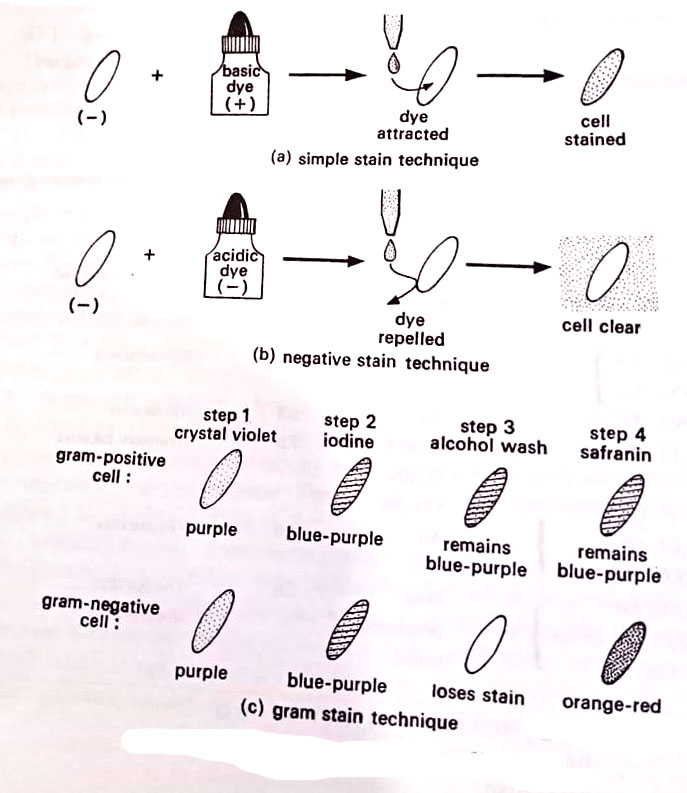
[II] Negative stain technique
This technique works in a manner opposite to simple technique. Bacteria are mixed on a slide with an acidic dye such as congo red or the black stain, nigrosin. The mixture is smeared across the face of the slide and allowed to air dry. Because the stain carries a negative charge, it is repelled by the bacteria, which also have a negative charge. The stain gathers around the cell. Since a chemical reaction has not taken place, and because heat-fixing has been avoided, the cells appear less shriveled or distorted. They often appear larger than stained cells and more natural. (BSc 2nd Year Methods in Microbiology Notes Study Material)
[III] Gram stain technique
A Danish scholar, Christian Gram 1884 devised a differential staining procedure, which differentiates between two kinds of bacteria – Gram-positive and Gram-negative bacteria. This procedure is called the Gram stain technique. Different steps of the Gram stain technique are as follows.
A thin smear of the bacterium is prepared on the slide. To the smear, crystal violet solution is applied for 30 seconds (step 1). The slide is then gently rinsed in clean water, and an iodine solution is applied for 30 seconds (step 2). This, in turn, is rinsed off. If the slide is examined, all cells would be deeply stained and appear blue-purple. Then, 95% ethyl alcohol is applied and this is renewed until all but the thickest parts of the smear have ceased to give off the dye (step 3). This usually takes from 20 seconds to one minute.
The differential feature of the stain becomes now apparent. Microscopic examination of the slide will reveal that Gram-positive bacteria retain the violet-iodine combination (retaining of blue-purple colour even after alcohol wash), whereas Gram-negative ones lose the blue-purple colour after alcohol wash, and will be of the original colour. The species which retain the stain are called Gram-positive, whereas those which yield the stain to alcohol are called Gram-negative bacteria. (BSc 2nd Year Methods in Microbiology Notes Study Material)
Then, there is applied a counterstain – a dye of some contrasting colour (step 4). The generally used counterstains are eosin (red), safranin (red), brilliant green, or Bismarck brown. Each of these colours the Gram-negative species. The cells become now clearly visible.
The reasons why bacteria respond differently to the Gram stain are not completely understood. It has been postulated that since Gram-negative bacteria have relatively a high lipid content in their cell walls, the alcohol dissolves the lipids, which allows the leakage of the crystal violet-iodine complex. The Grampositive bacteria with fewer lipids in their cell walls are less susceptible to the action of alcohol.
Another theory suggests that the peptidoglycan found in high concentration in the cell walls of Gram-positive bacteria perhaps traps the crystal violet-iodine complex in its many cross-linkages. The Gram-negative bacteria with less peptidoglycan and fewer cross-linkages lose the stain readily. (BSc 2nd Year Methods in Microbiology Notes Study Material)
It is important to note that there are some characteristic differences between most Gram-positive and Gram-negative bacteria. These are shown in Table. It should be evident that the property of Gram-positiveness is related to very fundamental physiological properties of the cell.

[IV] Acid-fast technique
Bacteria of the genus Mycobacterium possess waxy materials in their cell walls. They are difficult to stain by ordinary methods, and heat must be applied to force the dye molecules through to the cytoplasm. Once stained, however, the cells are not easily decolorized, even with an alcohol solution containing 5% acid. The organisms are said to be acid-resistant or acid-fast.
Air-dried heat-fixed smears are heated while being stained with Ziehl-Neelsen’s Carbolfuchsin. The cells become bright red. The smear is then rinsed with an acid alcohol decolorizer. During this time the acid-fast bacteria remain red while other bacteria lose their color. A counter stain, methylene blue is then applied to decolorized bacteria, after which the slide is rinsed, dried, and examined.
This technique is very useful for the final diagnosis of tuberculosis bacterium. A lipid detergent, the territory is added to carbolfuchsin, to dissolve the lipid in the cell wall and helps the penetration of the stain without heating.
[V] Special stain techniques
Spores may be stained by applying a heated malachite green stain to a smear of bacteria. The vigorous washing with water removes the stain from vegetative cells. Safranin is then applied to the smear, which is then washed. The technique observes green spores and red vegetative cells.
For staining capsules, two principles are applied: First, a negative stain is done to outline the cell and its capsule. Next, a simple stain is applied to add colour to the bacterial cell. The result is a stained bacterium with a colourless capsule on a dark background.
The development of the techniques described above could make it possible to isolate and purify the microorganisms. The early stages of microbiology were then concerned with the discovery of the structure and the biochemical activity of the organisms.
Finally, this led to a consideration of the mechanisms of heredity and of control of the expression of particular properties. The last 10-15 years have seen a gradual move away from consideration of the isolated organism and there is now much interest in mixed populations of cells and their role in the environment. (BSc 2nd Year Methods in Microbiology Notes Study Material)
Finally, the last phase is the development of microorganisms as biochemical reactors e.g. as hosts for foreign gene expression and as the producers of single enzymes or groups of enzymes concerned with specific reactions. The recent developments build upon the experience of earlier microbiologists and, therefore, an understanding of the core of microbiology is very essential.
Micrometry
Micrometry is the measurement of microorganisms. Since microorganisms can be seen only under a microscope, a suitable scale for their measurements should be somewhere in the microscope itself. For this, an ocular micrometer serves as a scale or rule. An ocular micrometer is simply a disc of glass upon which is etched lines. There are usually etched 100 equally spaced divisions, marked 0 to 10 upon an ocular micrometer. When placed in the ocular (eyepiece), the ruled lines superimpose certain distance markers on the microscope field.
However, the scale on the ocular micrometer does not have any standard value. We can find out the value of one division of this unknown scale by calibrating it with a known scale. Thus the actual value of one division of the ocular micrometer is found by using another known scale, the stage micrometer. A stage micrometer is simply a microscope glass slide having in its center a known (one millimeter) distance etched into 100 equally spaced divisions. This 1 mm (1000 um) distance is encircled and mounted by a cover glass.
Thus each division of the stage micrometer equals 0.01 mm or 10 um. The distance of each division of the stage micrometer becomes correspondingly enlarged under high power and oil-immersion objectives of the microscope. An ocular micrometer is, therefore, calibrated under different objective lens systems of the microscope. (BSc 2nd Year Methods in Microbiology Notes Study Material)
By determining how many divisions of ocular micrometer superimpose a known distance on the stage micrometer we may find out the exact value of one division of ocular micrometer in the microscope field. Once calibrated, the ocular micrometer can be used to measure the size of various microbes in terms of length, breadth, and diameter.

Procedure
(1) Remove the ocular (eyepiece) lens and insert the ocular micrometer on the circular shelf (metal diaphragm). Replace the ocular lens and mount it in the microscope and observe. There will be seen scale lines of ocular micrometer in sharp focus. The lines and distances will remain unchanged under different objectives. (BSc 2nd Year Methods in Microbiology Notes Study Material)
(2) Mount the stage micrometer on the microscope stage and bring its scale to the center of the microscope field under a sharp focus. This is done first with a low-power objective and thereafter also with high-power and oil-immersion objectives.
(3) Adjust the scales of the ocular micrometer and stage micrometer in such a way that the lines of the former superimpose upon those of the latter. If necessary the ocular micrometer may be rotated or the stage micrometer is moved on the stage so that lines of the ocular micrometer superimpose upon the stage micrometer. The scales of both micrometers are to be adjusted in a way that the lines of the two coincide at one end of the microscope field. (BSc 2nd Year Methods in Microbiology Notes Study Material)
Now count the spaces of each micrometer to a point where the lines of the two micrometers coincide again. In this way, we can find out how many divisions of the ocular micrometer (unknown scale) are equal to how many divisions of the stage micrometer (known scale).
For oil immersion, five divisions of ocular micrometer equal to one division of stage micrometer or 10 divisions of the former equal to two divisions of the latter. This is to be found out for (i) low power, (ii) high power, and (iii) oil-immersion objectives. For each objective, at least five readings are taken at random. (BSc 2nd Year Methods in Microbiology Notes Study Material)
Counting Cells, Spores
There are several methods that can be used for counting the cell spores of bacteria and other microbes. These include direct count, plate count, and most probable number (MPN) determinations.
[1] Direct count
The density of cells, spores, etc. of microorganisms can be found by counting their number in a unit volume.
The simplest technique is to use a special counting chamber, of a type that is used in a hemocytometer for counting the blood cells. The counting chamber is simply a ruled slide with a supported glass cover that holds a definite volume of fluid. This allows us to determine the exact number of cells, and spores for a given volume of fluid. The counting chamber on the glass slide has nine squares (each with an area of 1 mm x 1 mm) etched over it. Of these nine squares, only one can be seen per field under low power (100 x) magnification of the microscope.
There are three types of squares. Nine large squares (each I mm x 1 mm), medium-sized squares (each 0.2 mm x 0.2 mm) and small squares (each 0.05 mm x 0.05 mm). There are 25 medium-sized squares in each large square and 16 small squares in each medium-sized square. Each large square is 1 mm X 1 mm = 1 mm in area. Since the cover glass is 0.1 mm above the counting chamber, the depth of the chamber is 0.1 mm. Thus each large square has a volume of 1 mm x 1 mm X 0.1 mm or 1/10 cm X 1/10.cm X 1/100 cm = 1/10,000 cm3 or 10-4 cm3.

[II] Viable plate count
This is one of the most common methods for the enumeration of bacteria. Serial dilutions of suspension of bacteria are plated onto a suitable medium. The method of serial dilution of the sample has already been described earlier, where we could have 10-1 to 10-8 or more dilutions of the sample. The dilution procedure influences the overall counting process. The suspension is either spread over the surface of the growth medium or mixed with the agar prior to its solidification and then poured into the plate. The plates are incubated so that colonies are formed.
Multiplication of a bacterium on solid media results in the formation of a macroscopic colony visible to the naked eye. It is assumed that each colony arises from an individual viable cell. The total number of colonies is counted and this number is multiplied by the dilution factor to find out the concentration of cells in the original sample. Counting plates should have 30-300 colonies at least.
A major limitation of this method is selectivity. The nature of the growth medium and the incubation conditions determine which bacteria can grow and thus be and counted. Viable counting measures only those cells that are capable of growth on the given medium under the set of conditions used for incubation. Sometimes cells are viable but non-culturable.

[III] Turbidometry
Measuring the amount of light that passes through a suspension of microbe with a spectrophotometer or other optical measuring device is also used for the estimation of cell mass since the amount of light absorbed or scattered by the microscope is proportional to its cell density. Spectrophotometer measures absorbance units (A), defined as follows: A = log(10/1), where 10 is the intensity of light striking a suspension and 1, is the intensity of light transmitted by the suspension. (BSc 2nd Year Methods in Microbiology Notes Study Material)
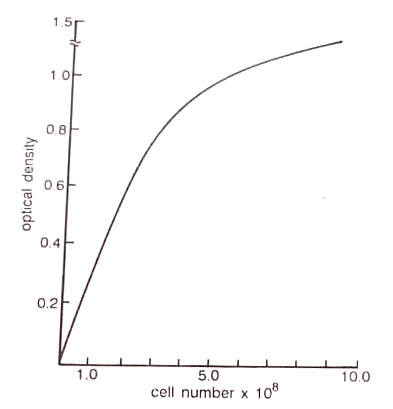
When calibrated against bacterial suspensions of known concentrations, spectrophotometers provide an accurate and rapid way to estimate the dry weight (mass) of bacteria per unit volume of culture. The instrument to be used must be calibrated for the particular bacterium and media being studied by directly determining the number of bacteria in a dense suspension and by measuring its absorbance A, as well as the absorbance of known dilutions of the suspension. (BSc 2nd Year Methods in Microbiology Notes Study Material)
BSc 2nd Year Methods in Microbiology Notes Study Material
BSc 2nd Year Sample Model Practice Mock Test Question Answer Papers